
Homemade dinner rolls, soft, fluffy, moist , warm and golden dinner rolls.
Your Ingredients:
2 cups of white flour
1 egg
1/2 cup milk, lukewarm
1/4 cup water
fresh yeast 1/2 cake of fresh yeast or 2 1/4 tsp dry
1 tsp. (5 ml) sugar
1 tsp. (5 ml) salt
1 tbsp. (15 ml ) butter/vegetable shortening
extra flour for kneading
1. In a small bowl combine the lukewarm milk, sugar and yeast then set aside. Make sure that the milk is not hot otherwise you will kill the yeast and the rolls won’t rise, (yup speaking from experience).
2. In a large bowl measure the flour and form a well in the center, add the salt, butter and egg. By now you’ll see the yeast has started foam and if so you’ll add it to the well in the flour. Either in an electric mixer or with your hands, begin combining the ingredients to make the dough. On a clean floured surface keep kneading until you form a smooth elastic dough, about 10 minutes, slowly adding a little extra flour if needed. Knead for a few more minutes to get air into the dough.
3. Divide the dough into 6 pieces. Use the palm of your hand and place on top of 1 piece turning in circles to form ball. Have fun with it make the shapes you like, I made snails rolls. As each piece is finished set it on a baking sheet. Once they have all been shaped you can either add an egg wash – a lightly beaten egg is used to brush on top the dough for a shiny surface, Or simply brush with milk – this helps with browning of the surface, or just leave as is. Set baking dish aside to allow the yeast to rise the dough.
 4. Once the rolls have doubled in size, anywhere from 30-50 minutes, you are ready to bake. Preheat oven to 200˚C / 375˚ F , wait 10 minutes to warm up then put the baking sheet in the oven. The rolls will bake in about 10- 15 minutes.
Let the rolls cool down a bit before you serve. I love this simple recipe, the way the kitchen smells when their baking and of course fresh baked rolls are so much better than prepackaged ones.
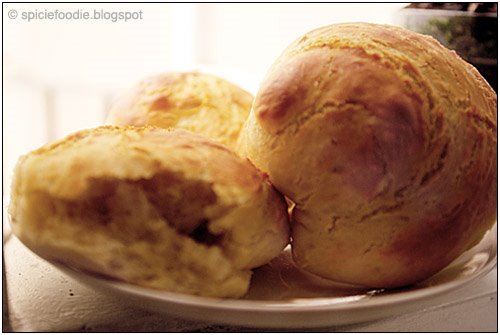
I can never wait until they have cooled down, have to cut a piece off right away. Yum!
Can my microwave serve as an oven?
I’ve never microwaved these rolls, but I don’t see why you couldn’t — though be warned that the texture will not be the same as if you warmed them up in the regular oven or toaster oven. Enjoy!